 DOCUMENTATION
Mission Equipment (PME)
What each sensor is and which one to fit is under Sensors. This page is how you use them.
The U-2S carries one imaging sensor at a time - the ASARS-2 radar nose, the SYERS-2A camera nose, or the optical bar camera (OBC) in the Q-bay behind the cockpit, which flies with the Standard nose only - and the PME pages are where you use it.
Which pages work depends on what is fitted on the EFB Aircraft tab: with the ASARS-2 nose the RDR and ASR pages are live; with the SYERS-2A nose, or the Standard nose and the OBC, it is CAM and SYR (it reads OBC with the Q-bay camera).
The tab of a sensor that is not fitted is gray and its page cannot be selected. All of them are run from the Mark IV panel on the right console: its MODE knob also powers the radar, and its hand control aims the camera and moves the radar cursor.
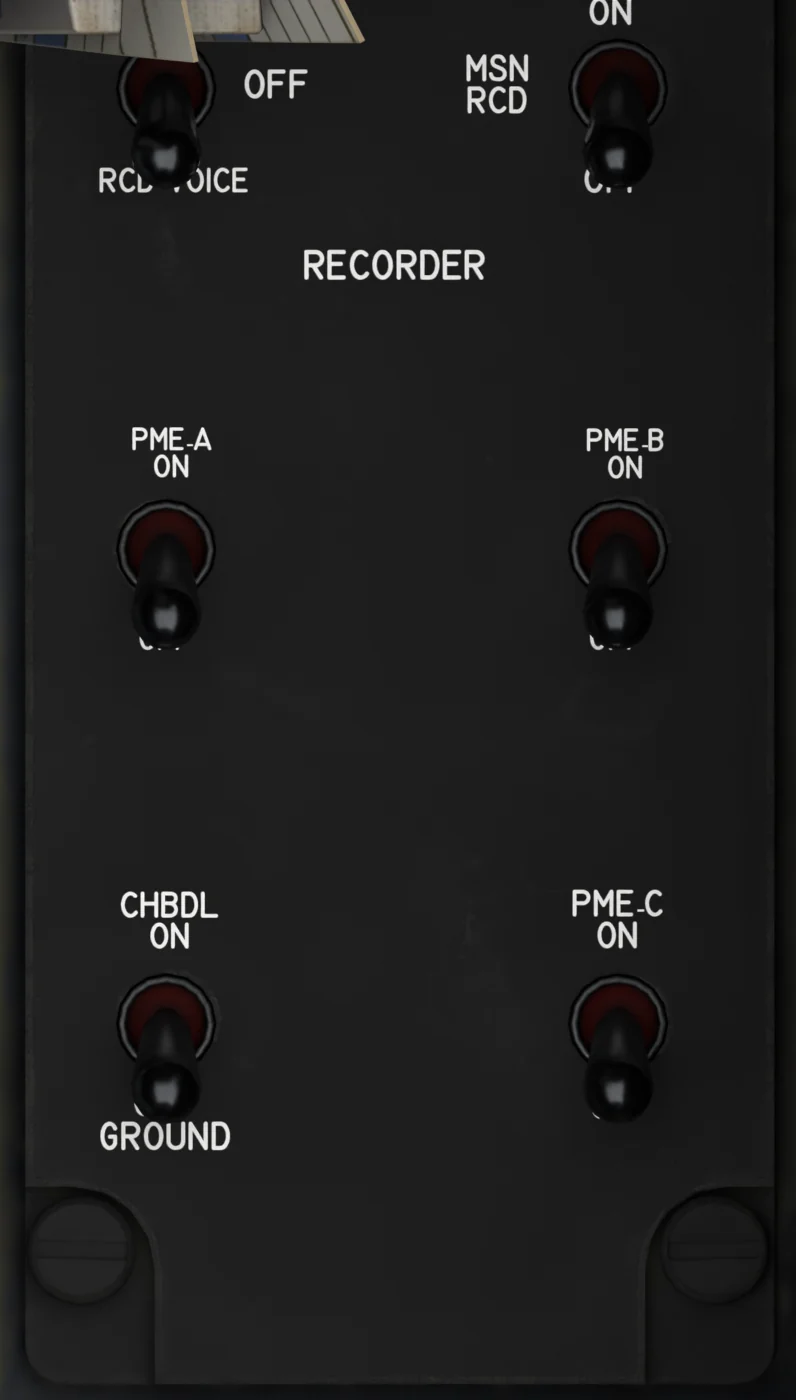
PME power panel
- RECORDER - RCD ALL / OFF / RCD VOICE. RCD VOICE is momentary: it disables the transmitters and springs back to OFF after 1.5 s. Nothing is actually recorded in the sim.
- MSN RCD - ON / OFF. The mission recorder: it must be ON for the EW threat tone. It is ON after a runway or in-flight start.
- PME A - ON / OFF. No function in the simulator (SIGINT is not simulated).
- PME B - ON / OFF. No function in the simulator (SIGINT is not simulated). The radar is powered from the Mark IV MODE knob.
- CHBDL - ON / OFF GROUND. No function in the simulator.
- PME C - ON / OFF. No function in the simulator (SIGINT is not simulated).
Both pages build their pictures from online map data while you fly: satellite imagery for the camera, terrain elevation for the radar. When a sensor gives no picture, its page shows a black screen with a status box telling you why, with the reason in cyan.
On the RDR page the first line is yellow; on the CAM page it is white for a normal step and yellow for what needs your attention.
| Status Box | Meaning |
|---|---|
| SYERS-2A OFF / OBC OFF | MK IV MASTER OFF: switch it ON. NO POWER: the aircraft has no electrical power. SYERS-2A only: MK IV MODE STBY TO START: turn MODE to STBY. SHUT DOWN - CYCLE MK IV MASTER: MODE went to OFF after the start - switch MASTER OFF and ON again. |
| ASARS-2A OFF | MK IV MODE STBY TO START: turn MODE to STBY. NO POWER: the aircraft has no electrical power. |
| NO CAMERA FITTED / ASARS-2A NOT INSTALLED | That sensor is not fitted - change the nose or the Q-bay on the EFB Aircraft tab. |
| WARMING UP + m:ss | The radar warm-up or the camera boot counting down. The OBC adds ADM BOOT - A LIGHT FLASHING. |
| SYERS-2A STBY | MK IV MODE 1-5: turn MODE from STBY to 1-5. |
| OBC STBY | MK IV MODE OFF FOR THE SELF-TEST, THEN 1-5: MODE is in STBY. Turn it OFF for the self-test; once that has passed, 1-5 works straight from STBY. NO SELF-TEST - MK IV MODE OFF FIRST: MODE went to 1-5 without a passed self-test. PHOTOGRAPHY ABOVE 5000 FT: it opens by itself when you climb through 5,000 ft. MK IV DRIFTSIGHT OFF (first line yellow): switch DRIFTSIGHT ON. |
| OBC SELF-TEST | FRAME 1 OF 5 and on: the self-test is running. OBC SELF-TEST GO with C LIGHT - MK IV MODE 1-5: it has passed. |
| OBC MAX FRAMES | 1600 FRAMES - A LIGHT: the film has run out and the OBC is not photographing. While it is open it stays on its last frame instead, with the tag MAX FRAMES. |
| ASARS-2A STBY | MK IV MODE 1-5: turn the Mark IV MODE knob to 1-5 for PWR. PWR WHEN AIRBORNE: it radiates after takeoff. SSA OFF is added while MK IV MASTER is off. OVERTEMP - COOLING: the transmitter has overheated (cooling failure) and stays in STBY until it has cooled down. |
| SYERS-2A INHIBITED / OBC INHIBITED | BELOW 1000 FT AGL: the camera does not image within 1,000 ft of the ground (AGL DATA UNAVAILABLE while the height above ground is unknown). |
| GIMBAL LIMIT | ROLL BEYOND STOPS or PITCH BEYOND STOPS: the line of sight is past the gimbal stops - more than 90° from the wings or 15° in pitch. Level the wings or the nose, or bring the camera back with the hand control. Never with the OBC, which has no gimbal. On the RDR page: more than 20° of bank or 10° of pitch, in any mode. No picture is taken meanwhile; once you are back within 19° and 9° the last pictures are on the scope again until new ones replace them. |
| NO GROUND IN VIEW | LOOK BELOW THE HORIZON: the line of sight does not meet the ground - bring it back down with the hand control. |
| ASARS NO RESPONSE | NOT ANSWERING ON THE 1553 BUS: a radar failure, with the advisory ASARS NO RESPONSE on the alert line. |
Camera open or radar sweeping, but no picture: the simulator cannot reach the map servers. The page itself does not say so; the EFB Datalink tab does - its Datalink Console lists the error (for example CAM, No data from image server, or RDR, No data from terrain server).
Check that the PC is online, then any VPN, antivirus web protection or web filter - some of them block these servers (one VPN's threat protection blocks the radar's elevation server in web browsers, for example). Allow mt0.google.com to mt3.google.com (camera imagery, radar SPOT imagery and the TP object read), tiles.openfreemap.org (camera road lights, radar airfields and buildings, the TP object read), s3.amazonaws.com (terrain elevation for the radar and the camera) and ic.imagery1.arcgis.com (radar land cover), or switch the filter off.
CAM - SYERS-2A and OBC Camera
Example PME CAM page
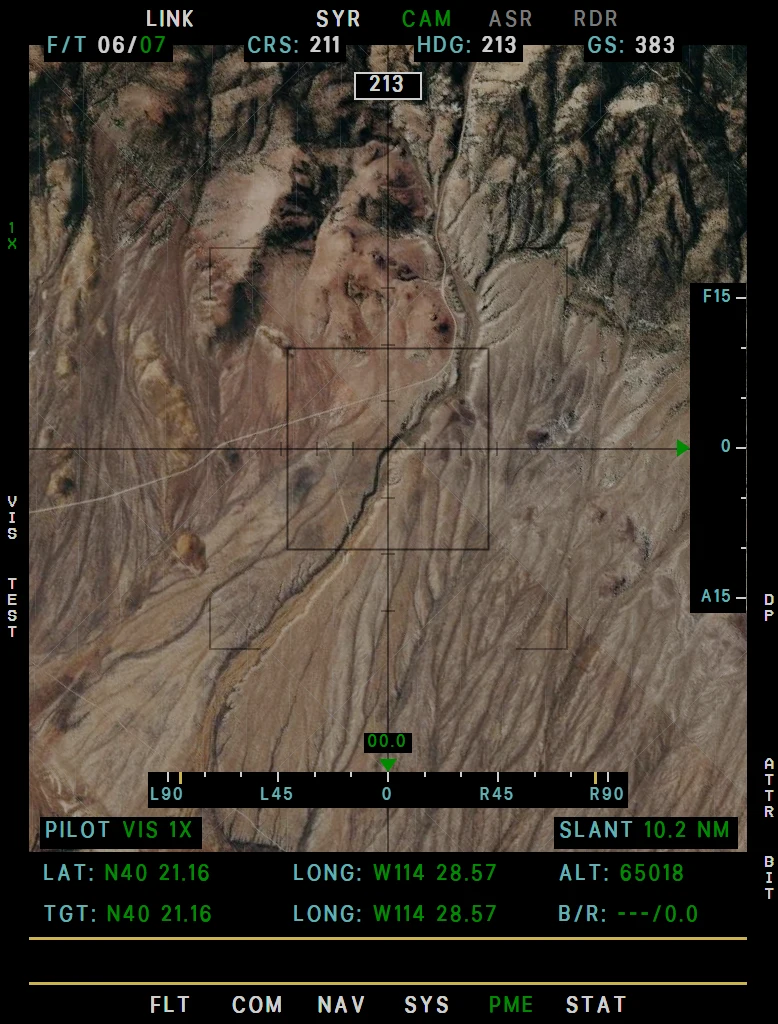
Example CAM page, MWIR band
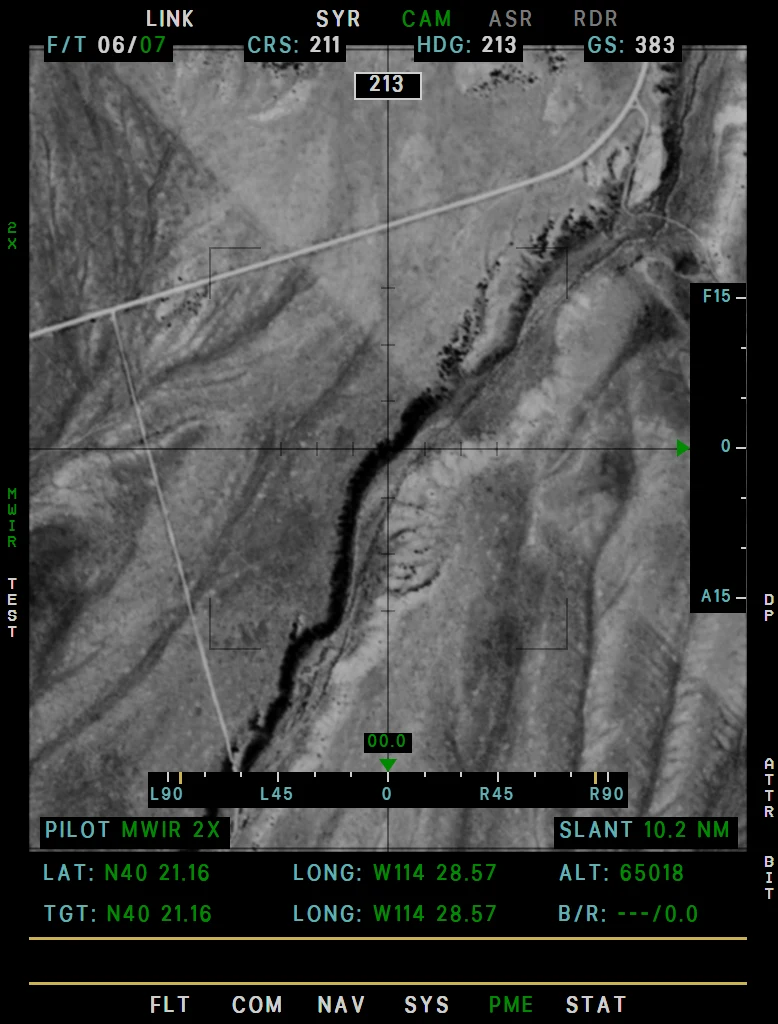
Example CAM page at night
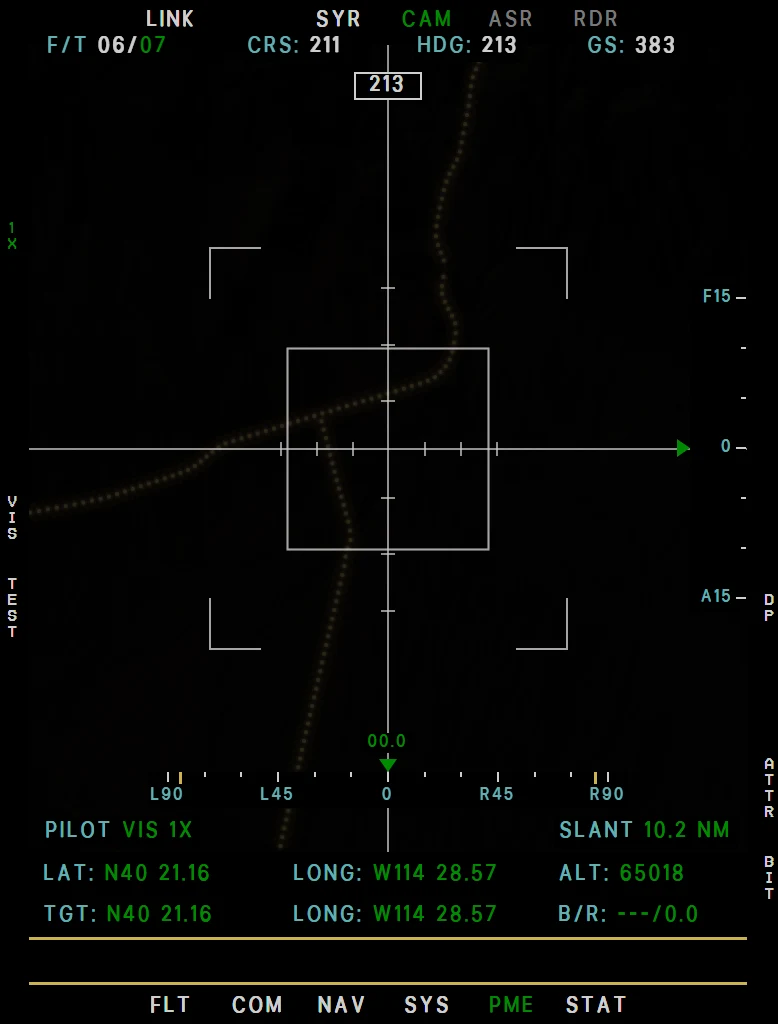
A reconnaissance view of the ground, built from online satellite imagery, with a reticle whose center box is one mile on a side on the ground, so it grows as you zoom in. You aim it with the viewsight hand control on the Mark IV panel.
Looking straight down the picture is flat and heading-up; looking out to the side you see the ground at an angle - near ground large, far ground small, haze in the distance and sky beyond the horizon - with the ground at the bottom of the picture.
The picture darkens at dusk, and at night it shows street lighting along real roads - the EFB option CAM road lights (Settings tab) is on at every flight start; switch it off if the frame rate suffers.
The page reads like the RDR page:
- Top row. Steering mode and DPs, CRS, HDG and GS, in black boxes over the picture. The box under it in the middle shows the magnetic heading. During a DP slew DP: names the point and its file.
- Roll and tilt scales. Roll runs along the bottom of the picture, 90° each way with yellow marks at the 85° reach of the hand control, and the value rides over its green caret, for example R60.0. Tilt runs up the right edge, 15° each way, F forward and A aft. A caret turns amber from 80° of roll or 10° of tilt.
- Mode line. On the left PILOT on the hand control, AUTO in a DP slew or TEST, with the band and zoom. On the right SLANT, the distance to the point the camera looks at.
- Data rows. LAT, LONG and ALT are your own. TGT, LONG and B/R (magnetic bearing / NM from you) are the ground under the crosshair.
Start the SYERS-2A on the Mark IV panel: MK IV MASTER ON, MODE STBY for the boot (30 seconds, 4 minutes on Realistic), then 1-5. The feed appears at once, at any height, looking straight down. The OBC has its own sequence - see Starting and Stopping the Camera.
| Key | Legend | Function |
|---|---|---|
| Left rocker | zoom, e.g. 4X | Zoom 0.5× to 73× in steps (0.5, 1, 2, 3, 4, 6, 8, 12, 16, 24, 32, 48, 64, 73), and on to 90× in SWIR and MWIR, only while the camera is open; green then. The distance to the point the camera looks at caps it: about 4× at 1,000 ft, 13× at 5,000 ft, 22× at 10,000 ft and 32× at about 14,000 ft. From there the whole range is open: above 32× the MFD magnifies the picture, so it gets softer. Also on key bindings - see Keybinds Guide. The OBC goes up to 15×. |
| L3 | VIS / NIR / SWIR / MWIR / MSI | Band: visible, near infrared, short-wave and mid-wave infrared, multispectral. NIR, SWIR and MWIR are black and white, MSI is false color. SWIR and MWIR magnify twice as much at the same zoom, with a coarser picture. Green when not VIS. Not with the OBC. |
| L4 | TEST | Self-test of about 19 seconds once the boot is done (MODE STBY or 1-5), at any altitude: the picture opens in VIS - on the ground as seen from 3,000 ft - the zoom sweeps to 8× and back to 1×, then your zoom comes back. The mode line reads TEST. L4 again cancels it. Not with the OBC: it has no legend there, and its self-test is MODE OFF. |
| L5 | LOCK / PAUSE | SYERS-2A, from STBY up: LOCK. Unlocked, the default (white legend), the camera keeps its angles to the aircraft, so the picture moves with you. Locked (green) it holds the spot on the ground it is looking at and turns by itself to keep it, until it reaches its fore / aft stop. A DP slew (R4, then R1 ENT) locks it by itself; unlocking ends a slew. OBC: PAUSE, while it is open: holds the picture on every MFD, with the tag PAUSED under the heading box and the legend green. The zoom and the hand control still work on the held picture, and the film keeps running. L5 again shows the live picture; so does the camera closing. |
| R4 | DP | DP slew, camera open: pick the file with R2 (ACT, ST1 to ST4, TP), step through its points with the right rocker, and R1 ENT points the camera at the point and locks on it (the SYERS-2A's LOCK turns green); the mode line reads AUTO. A number in amber is out of reach for now (85° to the side and 15° fore / aft) and ENT waits until it comes in. With the OBC only 45° to the side counts: it turns left or right toward the point, which comes into the picture as you pass it. R4 again ends the slew; so does moving the hand control, and the SYERS-2A then stays locked on that ground. |
| R6 | ATTR | Opens the CAM ATTRIBUTION box with the imagery, road-data and effects credits. R6 again, or leaving the page, closes it. The full list is on the EFB Datalink tab, under Attributions. |
| R7 | BIT | Opens STAT → FAULT with SYERS (or OBC) selected: its status color and current faults. The SYERS-2A's own self-test is L4 TEST, the OBC's is MODE OFF. |
Pointing the camera, the SYERS-2A lock, the SYERS-2A nose and the camera symbol on the MAP are under Mark IV Camera Panel.
OBC. The optical bar camera in the Q-bay (EFB Aircraft tab, Q-bay: OBC camera, 1,050 lb; Standard nose only) has its own start on the Mark IV panel - see Starting and Stopping the Camera - and the pages then read OBC.
It has one band, so no L3, and no L4 TEST. Its picture is a live feed in a black-and-white film look with grain. Detail falls off as you look out to the side, and the exposure follows the slit width of the MODE position against the height of the sun.
- Mode line. On the left OPR with the coverage and zoom, for example MONO 55% 1X. On the right LENS, the lens temperature - its heaters bring it to 75 °F in about 5 minutes once the camera has power, amber outside 73 - 77 °F - and FRAME.
- Film. FRAME counts the frames used, self-test included: one every 1.2 s with SHUTTER VELOCITY on 1, every 0.7 s on 2 - 4, up to 1,600, kept until you change the camera. At 1,600 FRAME turns yellow, the tag MAX FRAMES appears and A lights steady. The camera stays open on its last picture; the zoom and the hand control still work on it.
- Looking around. The camera itself cannot move: the hand control looks left and right on the feed, up to 45°, on a roll scale of that size. There is no tilt scale. The zoom goes up to 15×, and L5 PAUSE holds the picture.
- From outside. The camera sits lens up when off (MASTER off or MODE OFF) and lens down in STBY, and the bar spins when on, one turn per frame.
RDR - ASARS-2A Radar
Example PME RDR page
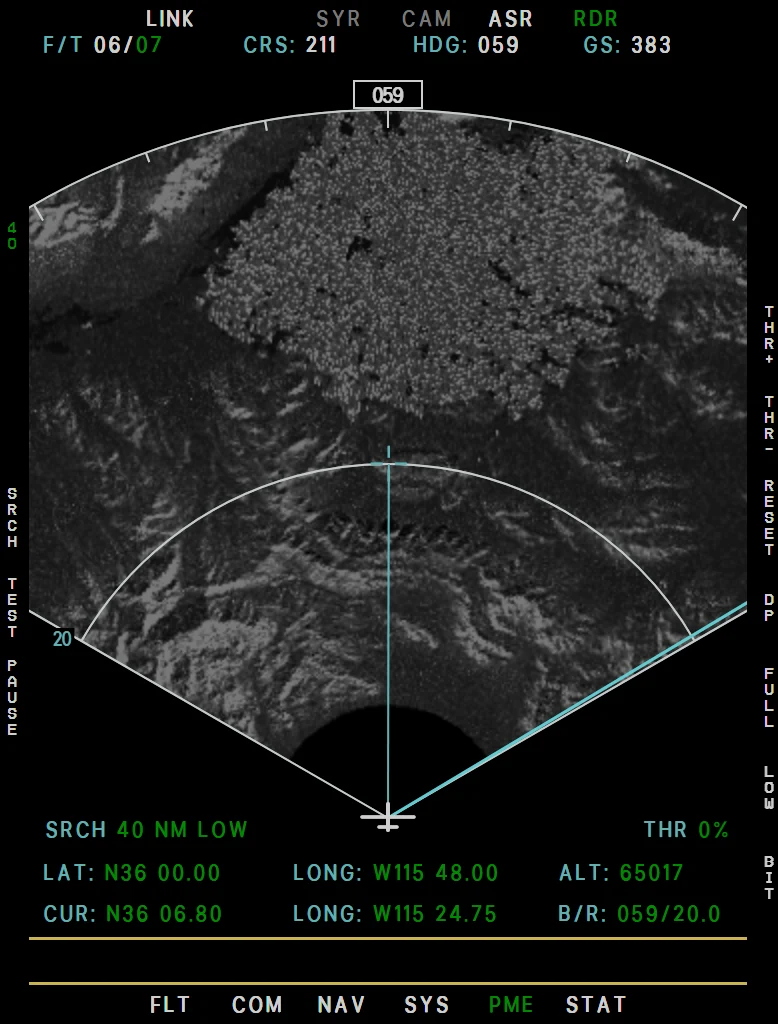
A ground-mapping radar scope built from real terrain elevation and land cover: a ±60° fan ahead of the aircraft, swept every few seconds, with the terrain lit from your side and water black. The picture reads like a real synthetic-aperture image: two-look speckle, farmland as a patchwork of fields with crop rows, tree crowns with their radar shadows on the finer scales, and star-shaped sidelobe streaks around the strongest built-up returns.
The top row shows the steering mode, course, heading and ground speed; the bottom rows your position and the cursor's position and bearing / range.
- ASARS-2 nose fitted, MK IV MODE on the Mark IV panel to STBY. The radar warms up (30 seconds, 12 minutes on Realistic), then STBY. With MODE OFF it stays off.
- MK IV MODE 1 - 5 is PWR, STBY is standby. You can select it during the warm-up or on the ground. Once airborne the sweep starts. The RDR page has no power key.
- MK IV MASTER ON powers the SSA recorder. With it off the radar works the same, but the page shows SSA OFF in the STBY box, and SSA OFF at the top of the scope while it radiates.
- Below 5,000 ft above the ground the scope reads ASARS-2A MAP DISABLED BELOW 5000 FT AGL.
| Key | Legend | Function |
|---|---|---|
| Left rocker | - | In SRCH the range: 10 / 20 / 40 / 80 / 160 / 240 / 320 NM, limited by the resolution (LOW 320, MID 160, HIGH 80 NM). In SPOT the patch size: LOW 10 / 20 / 40 NM, MID 5 / 10 / 20 NM, HIGH 0.1 / 0.25 / 0.5 / 1 / 2.5 / 5 / 10 NM. A new SPOT size starts a new image at once; the picture on the scope stays until the new one replaces it (RESCAN). |
| R1 / R2 | THR+ / THR- | Threshold - suppresses the weakest returns; the value shows beside the keys. |
| L2 | - | No function. The radar's power is the Mark IV MODE knob. |
| L3 | SRCH / SPOT | SRCH (search) = the full fan. SPOT = a small high-resolution patch on the ground around the cursor, starting at the size nearest a quarter of the range, imaged again every 15 seconds or so and held still while you look. A new spot - SPOT entered from SRCH, or the cursor moved more than about 1 % of the patch - shows IMAGING, counting down the time to form its picture, 3 to 30 seconds - longer for a farther or finer patch. The same spot taken again - the 15-second refresh, a new size or a new resolution - shows RESCAN, counting down to the next picture (0 while it is being taken). Either way the old picture stays until the new one replaces it. The top right of the scope shows the mode, range or patch size and resolution. |
| L4 | TEST | 10-second self-test: two sweeps through the display colors and symbols, then TEST COMPLETE - PASS, or BIT FAIL - ASARS FAULT with a fault. It works on the ground once the radar has warmed up. L4 again cancels it. |
| L5 | PAUSE | Freezes the picture. |
| Hand control | - | The cursor has no keys on the page: the viewsight hand control on the Mark IV panel places it in SRCH and moves the patch in SPOT, from where the patch is and the same distance on the scope at every patch size. The cursor is also drawn on the MAP page. |
| R3 | RESET | Clears the picture. SRCH sweeps a new one in, SPOT images again at once. |
| R4 | DP | (SRCH, radar operating) Puts the cursor on a destination point or a targeting point: pick the file with R2 (ACT, ST1 - ST4, TP), step through the points in range with the right rocker, R1 ENT. Route DPs are drawn in magenta on the scope, store-file DPs in cyan, TPs always as yellow boxes. Moving the hand control ends the DP and the cursor goes back to where the lever puts it. |
| R5 | FULL / LEFT / CNTR / RGHT | (SRCH) Sweep the whole fan or only its left, center or right third. |
| R6 | LOW / MID / HIGH | Resolution of the current mode. In SRCH a finer resolution reaches less far and sweeps more slowly; in SPOT it gives a smaller, sharper patch that takes longer to image, and a new step starts a new image at once. |
| R7 | BIT | Opens STAT → FAULT with ASARS selected: its status color and current faults. The radar's own self-test is L4 TEST. |
GIMBAL LIMIT appears over the picture when a SPOT patch is more than 55° off the nose, or out of the fan or range - turn towards it. The last picture stays under it, and a new one is taken once the patch is back in reach. Past 20° of bank or 10° of pitch it fills the page in any mode, because the radar has reached its stops; no picture is taken meanwhile, and back inside, the pictures you had are on the scope again until new ones replace them. The MAP page draws the radar's coverage fan while it radiates, and a cyan square around the SPOT patch.
TPs show on the scope as yellow boxes the size of the target - see Targeting Points.
Detail in SPOT. The closer the picture, the more it shows:
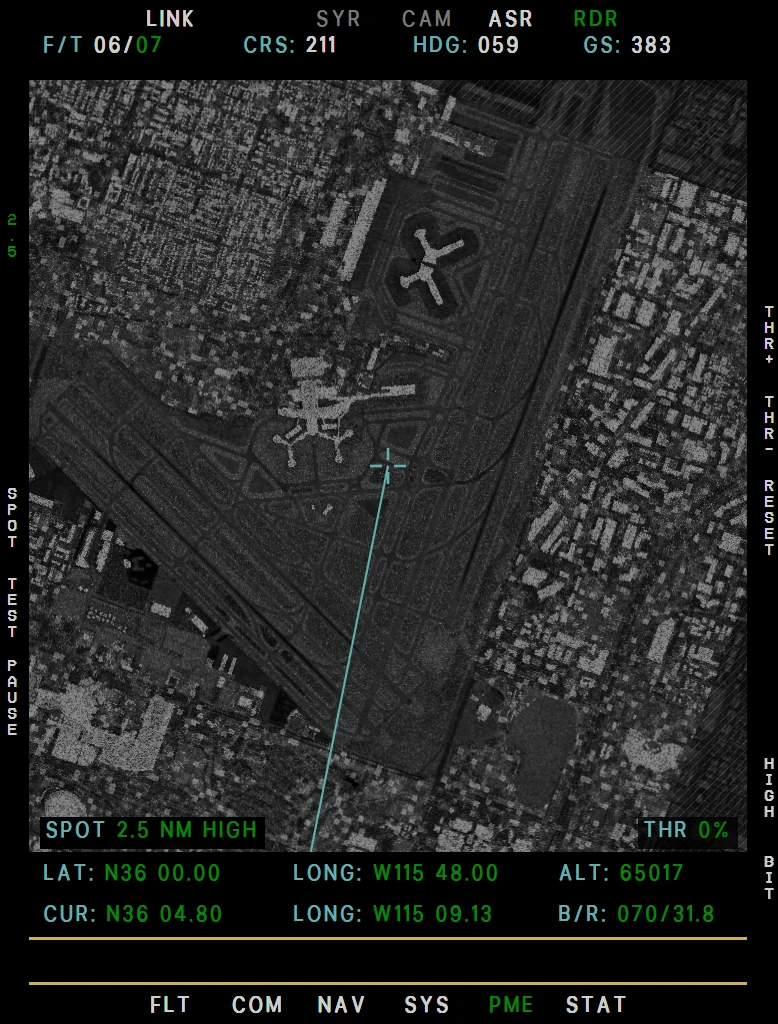
- 10 NM and closer: real airfields and buildings, from OpenStreetMap data. Runways, taxiways and aprons are black, the grass around them smooth and dark, buildings bright with sidelobe streaks. Parked aircraft are bright crosses.
- 2.5 NM and wider: a very faint gray layer of the camera's satellite imagery adds roads and airfields.
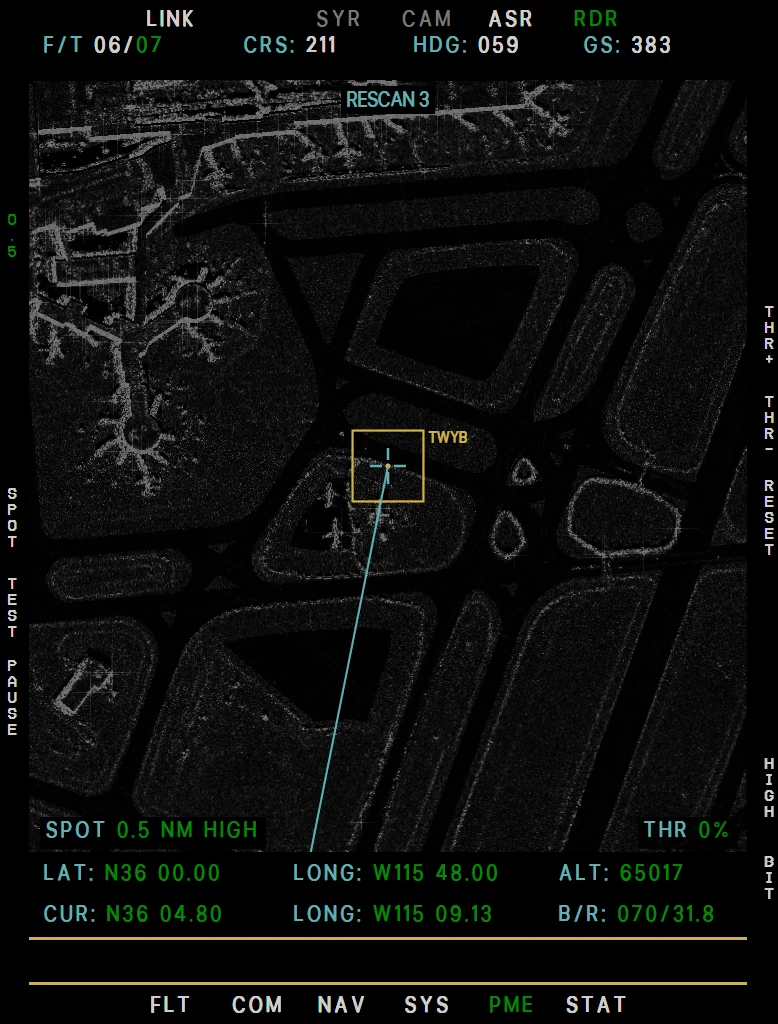
- 1 NM and closer: the picture is built from that imagery. Raised objects are speckled bright bodies with a bright edge toward the radar and a black shadow behind, flat roofs are dark, pavement is black and buildings lean toward the radar. From 0.5 NM parked aircraft are aircraft shapes with radar shadows.
- Every SPOT step: a faint dark grain over the whole picture.
Parked aircraft come from the live traffic (AI and multiplayer), not from aircraft in the scenery, and aircraft in the air are left out: there is no moving-target mode. The close steps show the real-world photo, so they can differ from the simulator's scenery. If the imagery server cannot be reached they fall back to the plain radar picture.
Example RDR SPOT 2.5 NM
Example RDR SPOT 0.5 NM
LINK, SYR, ASR
LINK shows the data-link (DDL2) status: it reads connected only while the EFB datalink (Datalink tab) is on. SYR (T3; it reads OBC with the Q-bay camera) and ASR (T5) are the status pages of the camera and the ASARS-2 radar - temperatures, pressures and BIT results, dashes while that sensor is off or not fitted.
On the camera page MODE shows the Mark IV MODE knob - OFF white, STBY cyan, 1 to 5 green - and SENS MODE the band (VIS during TEST). With the OBC the page is OBC STATUS: HC MODE is the MODE knob, HC VEL the SHUTTER VELOCITY position, SENS MODE reads STBY, TEST or OPR, SLIT WIDTH is the width of the MODE position in thousandths of an inch, COV the coverage and CYCLE RATE the seconds per frame.