 DOCUMENTATION
Mark IV Camera Panel
The Mark IV panel on the right console runs the reconnaissance camera - the SYERS-2A in the nose, or the optical bar camera (OBC) in the Q-bay - and its lever, the viewsight hand control, aims the camera and moves the radar cursor.
The pictures are on the MFD: the camera on the CAM page, the radar on the RDR page - see Mission Equipment (PME). With the ASARS-2 nose the MODE knob is the radar's power control and MK IV MASTER powers its SSA recorder.
With no imaging sensor fitted - the Standard nose and no OBC - the panel and its lever are gone and a blank plate takes their place.
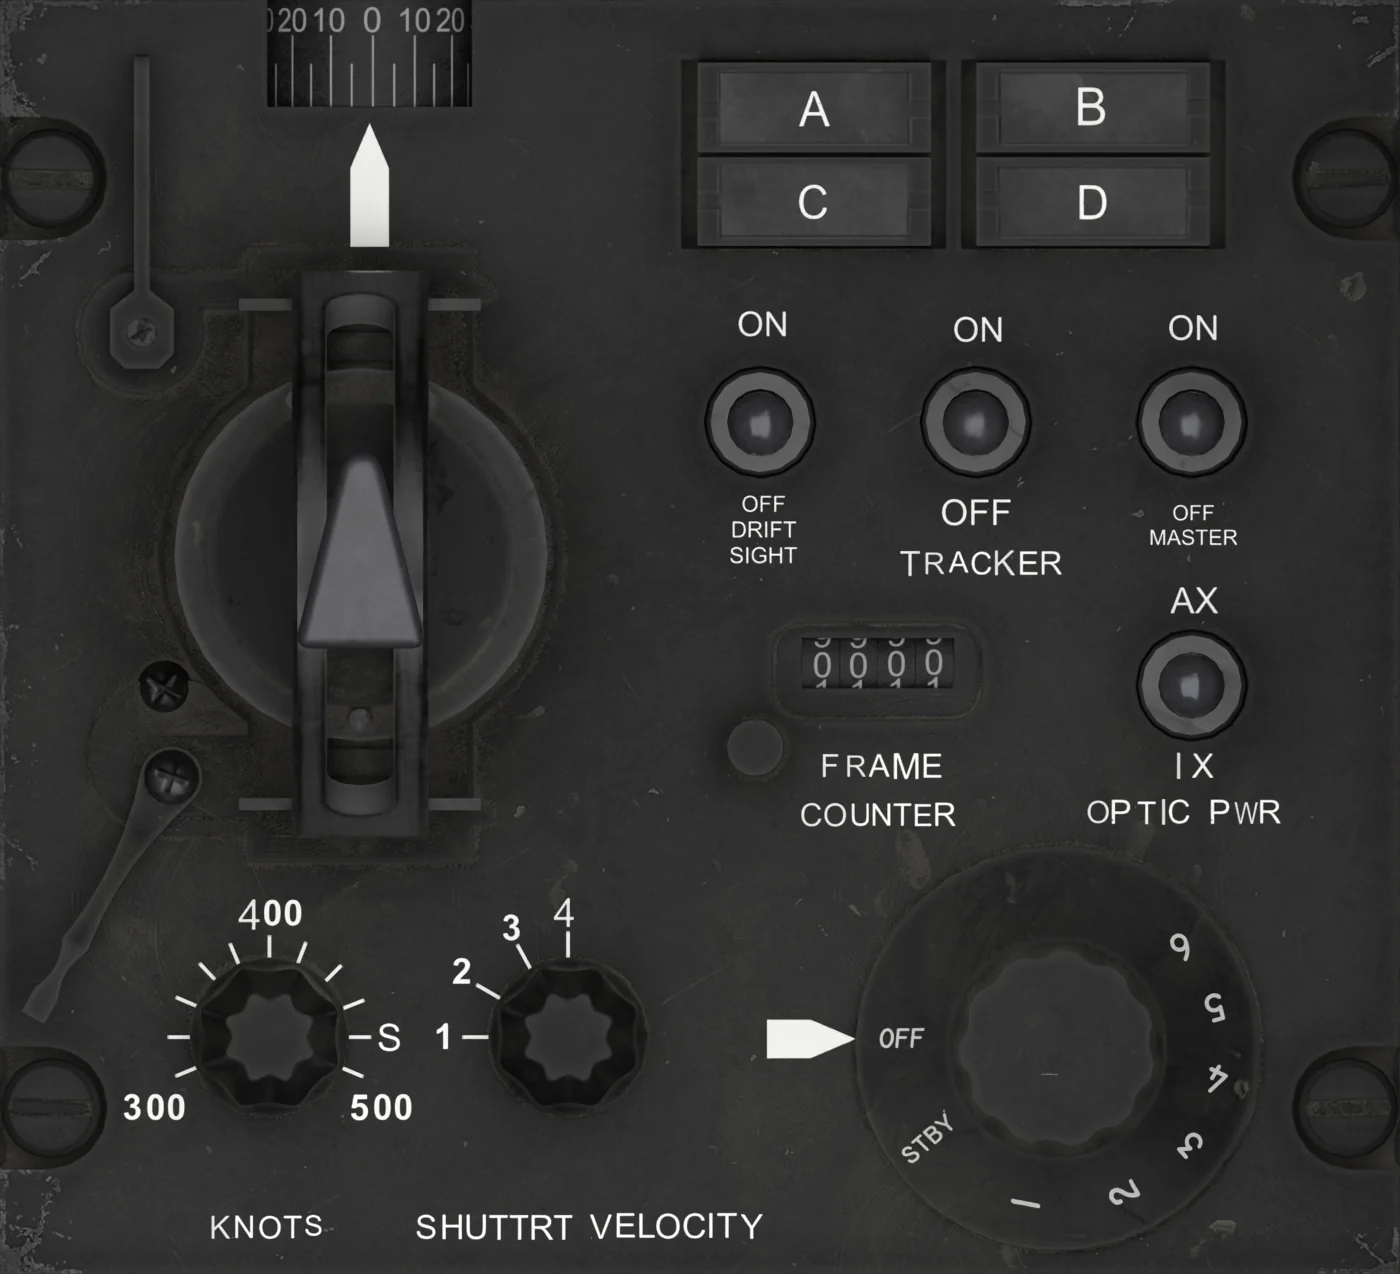
Mark IV panel
- OBLIQUE ANGLE INDICATOR - Shows how far the camera looks to the side. With the camera closed it follows the hand control left and right (full travel 85° with the SYERS-2A, 45° with the OBC or no camera); with the camera open it shows the camera's look roll.
- VIEWSIGHT HAND CONTROL - The big lever on the panel. It aims the camera and moves the ASARS-2 radar cursor - see Viewsight Hand Control below. Drag it (up / down = forward / aft, sideways = left / right), roll the mouse wheel (forward / aft) or use the key bindings.
- DRIFTSIGHT - ON / OFF. Powers the MODE and SHUTTER VELOCITY inputs for the OBC: with it OFF the OBC holds in standby. No function with the SYERS-2A or the ASARS-2 nose. It is ON after a runway or in-flight start.
- TRACKER - ON / OFF. The spare tracker camera. No function in the simulator.
- MK IV MASTER - Labeled MASTER on the panel. ON / OFF. Powers the camera: the SYERS-2A sensor with its nose servo and nose heat, or the OBC with its air compressors and lens heaters - switching it ON starts the OBC's boot. With the ASARS-2 nose it powers the radar's SSA recorder. It is ON after a runway or in-flight start.
- FRAME COUNTER - Four drums that count the OBC's frames, self-test frames included, up to 9999 and round again. Click the round reset button to their left to set them to 0000. That gives no film back: the film used is FRAME on the CAM page.
- VIEWSIGHT OPTICAL POWER - Labeled OPTIC PWR. 1X / 4X. No function in the simulator; the camera zoom is on the MFD CAM page.
- IMAGE MOTION COMPENSATION - Labeled KNOTS, 300 - 500. No function in the simulator.
- SHUTTER VELOCITY - 1 - 4. With the OBC it sets how fast the film runs: on 1 a frame every 1.2 s (the film lasts about 33 minutes), on 2 - 4 a frame every 0.7 s (about 18 minutes). The CAM page names the coverage - 1 MONO 20%, 2 and 3 STEREO, 4 MONO 55% - but the picture looks the same on all four. No function with the SYERS-2A.
- MK IV MODE - OFF / STBY / 1 - 5. Click or wheel up steps it on, right-click or wheel down steps it back. The tooltip also lists the lights that are on. With the SYERS-2A, STBY starts the boot, 1 - 5 (all five work the same) open the camera, and OFF after a start shuts it down until MK IV MASTER has been switched OFF and ON again.
With the OBC, OFF runs the self-test, STBY is standby and 1 - 5 photograph, each with its own slit width. With the ASARS-2 nose, OFF is off, STBY starts the warm-up and holds the radar in standby, and 1 - 5 is radar PWR.
- A / B / C / D lights - Amber. All four light with MASTER LT TEST. With the SYERS-2A: A nose servo fault (none simulated); C during the second half of the boot, for about 3 minutes after MODE 1 - 5 (about 20 s with the short warm-up) and for the first 5 s of a shutdown; D from 5 s after MODE OFF until 30 s after MASTER OFF.
With the OBC: A flashes during the boot and is steady once the film has run out; C comes on after the fourth self-test frame (go) and stays on in MODE OFF and 1 - 5, flashing in 1 - 5 without INS navigation data; D has no function. B has no function with either camera.
Starting and Stopping the Camera
The camera fitted - the SYERS-2A nose, or the Standard nose with the OBC in the Q-bay - is chosen on the EFB Aircraft tab. The two start differently, and the CAM page shows each step in its status box.
SYERS-2A
- MK IV MASTER ON. The page reads SYERS-2A OFF MK IV MODE STBY TO START.
- MODE to STBY: the boot starts - the countdown runs 30 seconds (4 minutes on Realistic) and C lights for its second half. Then SYERS-2A STBY.
- MODE to 1-5 (all five work the same): the feed appears, looking straight down wherever the lever was left. There is no height rule, only the limit of 1,000 ft above the ground. MODE back to STBY closes the camera.
- To shut down: MODE OFF - C for 5 s, then D. The camera stays off until MK IV MASTER has been switched OFF and ON again; D goes out 30 s after MASTER OFF. MASTER OFF, a change of camera or a loss of power also stop it, and the next start boots again.
OBC
- DRIFTSIGHT ON. From cold and dark it is OFF, also after the EFB Set up aircraft presets, and the page then holds at OBC STBY MK IV DRIFTSIGHT OFF.
- MK IV MASTER ON: the boot starts by itself, wherever MODE is - 30 seconds (90 on Realistic) with A flashing. The page reads OBC WARMING UP ADM BOOT - A LIGHT FLASHING.
- MODE OFF: once the boot is done the self-test runs, five frames at the film rate (3 to 6 seconds), and the page counts OBC SELF-TEST FRAME 1 OF 5. C comes on after the fourth frame: that is the go, and the page reads OBC SELF-TEST GO. To run it again go OFF - STBY - OFF. The frames come off the film.
- MODE to 1-5 at or above 5,000 ft: the OBC photographs. Each position is a slit width for the light: 1 suits a sun about 12° up, 2 about 16°, 3 about 24°, 4 about 35° and 5 about 53° or higher. The wrong one shows: too wide a slit washes the picture out, too narrow darkens it.
Below 5,000 ft the page waits at OBC STBY PHOTOGRAPHY ABOVE 5000 FT and opens by itself as you climb through it. Without a passed self-test it reads NO SELF-TEST - MK IV MODE OFF FIRST.
- To stop: MODE STBY stops the frames. MODE OFF runs the self-test again. MASTER OFF, a change of camera or a loss of power also stop it, and the next start needs the boot and the self-test again.
ASARS-2 radar. MODE OFF is off. STBY starts the warm-up (30 seconds, 12 minutes on Realistic) and then holds it in STBY. 1-5 is PWR and it radiates once airborne, so you can set it on the ground. Back to OFF drops it, and the next start warms up again. MK IV MASTER is not needed for the radar itself, only for its SSA recorder.
The boot time follows the EFB option Sensor warm-up time (Settings tab): 30 seconds on Short; on Realistic 4 minutes for the SYERS-2A and 90 seconds for the OBC. A runway or in-flight start comes up with MK IV MASTER and DRIFTSIGHT ON and MODE OFF: the OBC boots and runs its self-test by itself, so you only turn MODE to 1-5. The SYERS-2A still waits for MODE: STBY, or 1-5 straight away, starts its boot.
Viewsight Hand Control
The lever beside the panel is your aiming control. While the camera is open or in TEST it points the camera; with the ASARS-2 nose it is the radar cursor.
- Aiming. Moving the hand control turns the line of sight: sideways up to 85° left or right of straight down, forward / aft up to 15°. The camera opens straight down, wherever the lever was left. It turns at most 60° a second sideways and 30° forward / aft, so a fast move swings it rather than jumping. The OBC cannot move: with it the hand control looks left and right on the feed instead, up to 45°, and forward / aft does nothing.
- Lock (SYERS-2A). Unlocked, the default, the camera keeps its angles to the aircraft when you let go, so the picture moves with you. With L5 LOCK on the CAM page (green) it stays on the spot it is looking at: it turns by itself as you fly, turn, bank or climb.
At a stop it cannot follow any further and the spot slides along with you - flying straight, the aft stop is reached within a minute or so, depending on how far out you look. The lock sits on the real terrain under the crosshair, so a spot well above or below the ground under you holds too.
That takes the online elevation data: without it the camera works on the level of the ground under the aircraft, and a far spot on higher or lower ground creeps away. A DP slew locks it by itself. The OBC has no lock: its look stays at the angle you set, except during a DP slew.
- The lever follows the look. The hand control shifts the line of sight by how far you move it. After that the lever is kept where the camera looks, with the center of its travel straight down, so it always has the travel left to each stop - and you will see it creep by itself as the lock turns the camera. Read the angles on the roll and tilt scales of the CAM page, or see the crosshair on the MAP.
- Speed. With either camera every input is divided by the zoom (and halved again in SWIR and MWIR), so the picture pans at the same pace at any zoom. A centering stick such as a throttle TDC works as a rate control: at 1× full deflection moves the lever 5 % of its travel a second, less near the center, with a small dead zone, and the lever stays where it is when you let go.
- Straight down. Set condition lever sends the camera straight down (and locks it there with LOCK on). The CAM page R4 DP slew points it at a destination point or TP instead and locks it; moving the hand control ends the slew and the camera stays locked on that ground. The EFB option Camera straight-down lock (Settings tab) holds either camera straight down with a flat picture, and the hand control has no effect on it.
- Nose and stops. The SYERS-2A nose rolls to the line of sight, against your bank, at about 60° a second - with MK IV MASTER ON, the boot done and at or above 5,000 ft. Below 5,000 ft it centers and stows, though the camera still images. Past the stops - 90° from the wings or 15° in pitch - the CAM picture is blank with GIMBAL LIMIT. The OBC has no gimbal, so no GIMBAL LIMIT either.
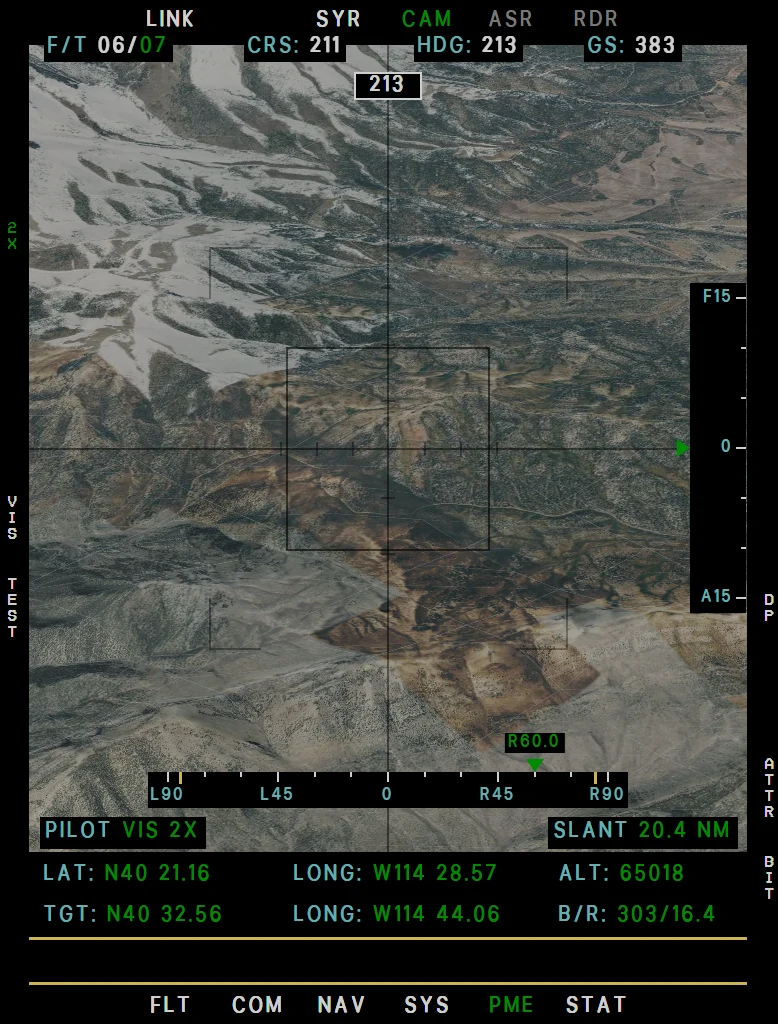
Example CAM page, camera 60 degrees right
ASARS-2 radar cursor. With the ASARS-2 nose the hand control is the radar cursor; the RDR page has no cursor keys. In SRCH the lever position is the cursor: left / right is the bearing, up to 60° either side; forward / aft is the range, from 5 % of the scope range at the aft stop through half range in the centre to full range forward.
Set condition lever puts it straight ahead at half range. In SPOT the hand control moves the patch from where it is, scaled by the patch size so that a move covers the same distance on the scope at every size, and a new picture is taken once you stop moving. Leaving the RDR page and coming back does not move the patch. The lever goes back to the center by itself once past a quarter of its travel, so the patch keeps moving while you hold it, and back in SRCH the lever is put where the patch is.
A DP slew on the RDR page (R4) ends as soon as you move the hand control.
On the MAP. While the camera is open, or in the SYERS-2A TEST, the MAP page shows where it looks: the radar's cyan crosshair on the ground under the CAM crosshair, in a box the size of the CAM picture, turned with the picture.
The box shrinks as you zoom in. Past the gimbal stops it turns dashed and the crosshair goes. The radar cursor is drawn on the MAP as well.
| Binding (MSFS Controls) | Hand control |
|---|---|
| Increase condition lever 1 / Decrease condition lever 1 | Forward / aft, a step per press |
| Condition lever 1 axis | Forward / aft as a rate - for a centring stick |
| Increase condition lever 2 / Decrease condition lever 2 | Right / left, a step per press |
| Condition lever 2 axis | Right / left as a rate |
| Set condition lever | Camera straight down; radar cursor ahead at half range |